Neopixel: Part 2
core
radio
microphone
neopixel=github:microsoft/pxt-neopixel
basic.forever(function () {
strip = neopixel.create(DigitalPin.P0, 10, NeoPixelMode.RGB)
})
basic.forever(function () {
})
Step 0 @showDialog
Hello! Today we’re going to continue discovering new possibilities for LED lighting.
Before starting, make sure the Micro:bit is connected to the LED strip as shown in the diagram.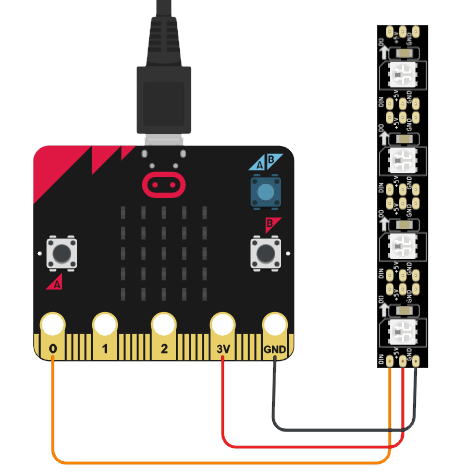
Step 1 @showDialog
The most useful block
In the last lesson, each block we added to the program instantly changed the color of the entire LED strip. But this time, we’re going to change the colors of each LED separately.
The Neopixel extension makes it possible to first change the states of the LEDs using a list of instructions and then use a separate command to apply all those changes at the same time. This command is a ||neopixel.show|| block.
let strip: neopixel.Strip = null
strip.show()
The ||neopixel.show|| block applies all the instructions that have been recorded since the previous ||neopixel.show|| command was executed to the LED strip. Without this, the changes will not be displayed.
Step 2 @showDialog
Controlling LEDs
A ||neopixel.set pixel color|| block applies a color from the list to the selected LED.
` Important: computers start counting not from one, but from zero. Therefore, in a strip of 10 LEDs, the first will be assigned the number 0, and the last the number 9.`
let strip: neopixel.Strip = null
strip.setPixelColor(0, neopixel.colors(NeoPixelColors.Red))
A ||neopixel.rotate pixels|| block shifts all the lit-up LEDs by the selected number of positions. The colors that were at the end do not disappear but are moved to the beginning.
let strip: neopixel.Strip = null
strip.rotate(1)
A ||neopixel.set brightness|| block adjusts the brightness of all the lit-up LEDs. The maximum possible brightness is 255.
let strip: neopixel.Strip = null
strip.setBrightness(255)
Once again, let’s remember that these blocks do not instantly update the strip colors - they only prepare the instructions that will be executed with the ||neopixel.show|| block.
Step 3 @showDialog
Let’s see how this works
To better understand how to use the new commands, let’s put together some sample programs using the new blocks of code!
Step 3.5 @showHint
Example 1: Running light
In this example, a red light moves across the LED strip when the buttons are pressed.
input.onButtonPressed(Button.A, function () {
    strip.rotate(-1)
    strip.show()
})
input.onButtonPressed(Button.B, function () {
    strip.rotate(1)
    strip.show()
})
let strip: neopixel.Strip = null
strip = neopixel.create(DigitalPin.P0, 10, NeoPixelMode.RGB)
strip.setPixelColor(4, neopixel.colors(NeoPixelColors.Red))
strip.show()
Step 4 @showHint
Example 2: Police flasher
In this example, the backlight shows a rotating blue and red light. If you want, you can add the sounds of a police siren to the program!
let strip = neopixel.create(DigitalPin.P0, 10, NeoPixelMode.RGB)
strip.showColor(neopixel.colors(NeoPixelColors.Blue))
strip.setPixelColor(0, neopixel.colors(NeoPixelColors.Red))
strip.setPixelColor(1, neopixel.colors(NeoPixelColors.Red))
strip.setPixelColor(2, neopixel.colors(NeoPixelColors.Red))
strip.setPixelColor(3, neopixel.colors(NeoPixelColors.Red))
strip.setPixelColor(4, neopixel.colors(NeoPixelColors.Red))
basic.forever(function () {
    strip.rotate(1)
    strip.show()
    basic.pause(50)
})
Step 5 @showHint
Example 3: Volume indicator
In this example, the position of the red light on the strip depends on the volume level.
let strip = neopixel.create(DigitalPin.P0, 10, NeoPixelMode.RGB)
basic.forever(function () {
    strip.showColor(neopixel.colors(NeoPixelColors.Blue))
    strip.setPixelColor(0, neopixel.colors(NeoPixelColors.Red))
    strip.rotate(Math.map(input.soundLevel(), 0, 255, 0, 9))
    strip.show()
})
Step 6
Now it’s your turn!
Let’s see how we’ve learned to control the LEDs. Write a program that displays a rainbow on an LED strip. In this tutorial, the ||neopixel.show rainbow|| block is disabled so, in order to do this, you need to set the color for each LED manually.
Step 7 @showDialog
More colors!
Displays, LEDs, and monitor screens use the so-called RGB color model to encode colors. In this model, a color is described in terms of the sum of three colors: red (R), green (G), and blue (B).
The RGB model works differently from the usual mixing of colors on a palette. Combinations of two colors give us different results, and combining the maximum of all colors results in white.
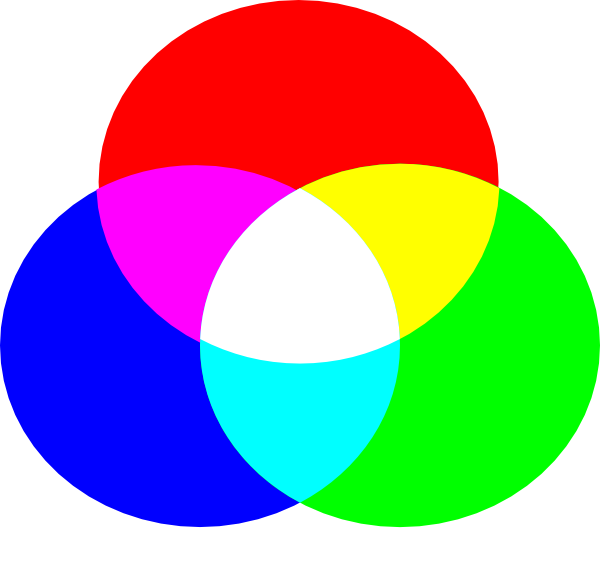
You can set a color using this model with the ||neopixel.red green blue|| block, which can be added instead of the standard list of colors. By choosing the amount of each color, from 0 to 255, it is possible to display up to 16,581,375 different colors!
let strip: neopixel.Strip = null
strip.setPixelColor(0, neopixel.rgb(255, 255, 255))
Step 8 @showHint
More colors!
Try to display the following colors on the LED strip. Are they any different from the ones we’ve seen before?
let strip: neopixel.Strip = null
strip.setPixelColor(0, neopixel.rgb(0, 255, 255))
let strip: neopixel.Strip = null
strip.setPixelColor(0, neopixel.rgb(255, 0, 255))
let strip: neopixel.Strip = null
strip.setPixelColor(0, neopixel.rgb(255, 255, 0))
Step 9 @showHint
Gradient
A gradient is a smooth transition between two colors.
We have an assignment for you. Using the ||neopixel.red green blue|| block to precisely control the amount of each of the three colors in the final color, show a smooth transition from one color to the other on the LED strip.

Step 10 @showDialog
Answers: Now it’s your turn!
let strip = neopixel.create(DigitalPin.P0, 10, NeoPixelMode.RGB)
strip.setPixelColor(0, neopixel.colors(NeoPixelColors.Red))
strip.setPixelColor(1, neopixel.colors(NeoPixelColors.Orange))
strip.setPixelColor(2, neopixel.colors(NeoPixelColors.Yellow))
strip.setPixelColor(3, neopixel.colors(NeoPixelColors.Green))
strip.setPixelColor(4, neopixel.colors(NeoPixelColors.Blue))
strip.setPixelColor(5, neopixel.colors(NeoPixelColors.Indigo))
strip.setPixelColor(6, neopixel.colors(NeoPixelColors.Purple))
strip.show()
Answers: Gradient
This is what a smooth transition from green to red might look like.
let strip = neopixel.create(DigitalPin.P0, 10, NeoPixelMode.RGB)
strip.setPixelColor(0, neopixel.rgb(0, 225, 0))
strip.setPixelColor(1, neopixel.rgb(25, 200, 0))
strip.setPixelColor(2, neopixel.rgb(50, 175, 0))
strip.setPixelColor(3, neopixel.rgb(100, 150, 0))
strip.setPixelColor(4, neopixel.rgb(125, 125, 0))
strip.setPixelColor(5, neopixel.rgb(150, 100, 0))
strip.setPixelColor(6, neopixel.rgb(175, 75, 0))
strip.setPixelColor(7, neopixel.rgb(200, 50, 0))
strip.setPixelColor(8, neopixel.rgb(225, 25, 0))
strip.setPixelColor(9, neopixel.rgb(255, 0, 0))
strip.show()
Step 9
Tasks completed! Now you know how to display any color using an LED strip. If your project needs the Neopixel extension, you can search for and activate it in the |Advanced| - |Extensions| folder.